Clickbonds
or
"How to hang just about anything just about anywhere"
Clickbonds
or
"How to hang just about anything just about anywhere"
We have purchased and installed probably about a hundred of these handy fasteners in our Cozy by now.
We like them so much we have purchased them in bulk and make them available for $12.50/bag of 10
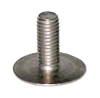
For the purpose of this cartoon "how to" we will assume that when we mention Clickbonds we are talking about a single item in the form we obtain them. These are an AN-3 or 10-32 UNF thread .50" long stud with a .625" diameter by .02" thick head on them. We buy them bare but they normally come with a little self adhesive carrier, epoxy and instructions but none of that will be needed for what we are going to show here. Besides, other vendors want over $3 each for them.
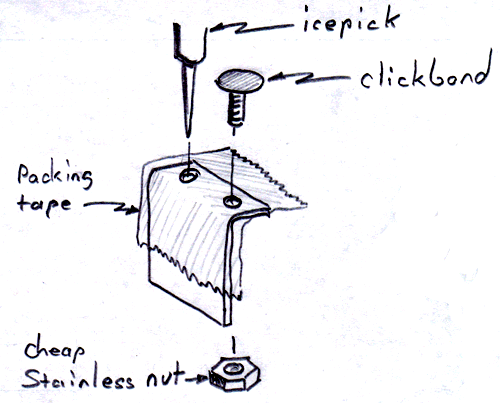
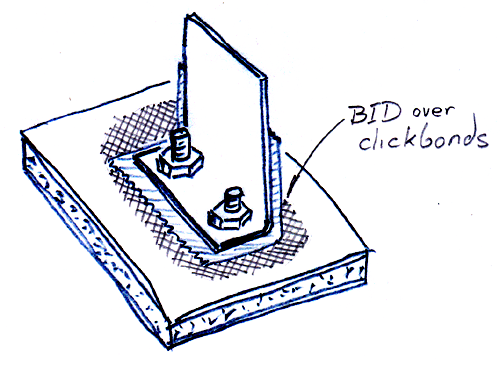
The first step is to mask off the part you wish to mount, in the example here we are showing a sheet metal bracket. We use clear packing tape. Poke the screw holes with an ice pick, clean the Clickbonds with acetone then insert the Clickbonds and secure with common hardware store stainless steel nuts. Wear gloves to prevent oil from hands contaminating the bonding surfaces.
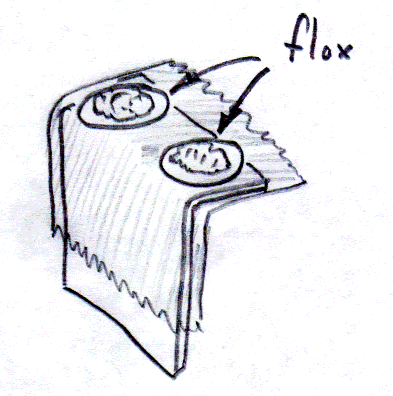
Apply a small amount of flox to the bonding surface of the Clickbonds, you want
enough to cover the surface and fill any gap but not an excessive amount.
Sand the area of the bulkhead where you intend to mount the part.
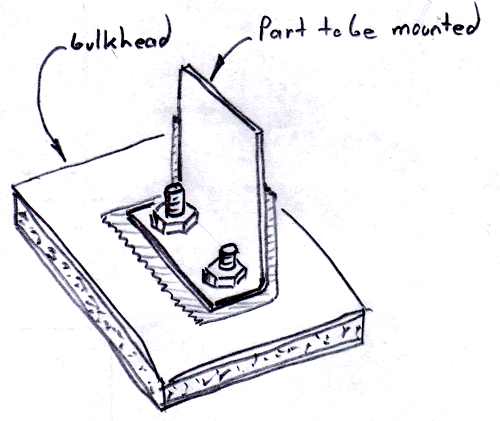
If there are two or more brackets that fasten a single part like a pair of
pulley brackets, assemble all the parts and mount them as a single assembly.
Fixture the part in place until the flox has set.
Remove the stainless steel nuts and the bracket, remove the packing tape and
apply a new layer of tape to the part.
Sand the area of the bulkhead around the Clickbonds, sand any squeezed out flox
until dull and flush with the flange on the fastener.
Put vinyl electrical tape on the threads to prevent epoxy from getting on them.
Apply a small amount of flox around the head of the fastener to fair it into the
bulkhead and prevent air bubbles.
Depending on the loading of the part, apply a 1 or 2 BID layer patch over the
studs. You want it to extend 1" beyond the head of the fastener. Be sure to work
out any air bubbles then cover this with peel ply.
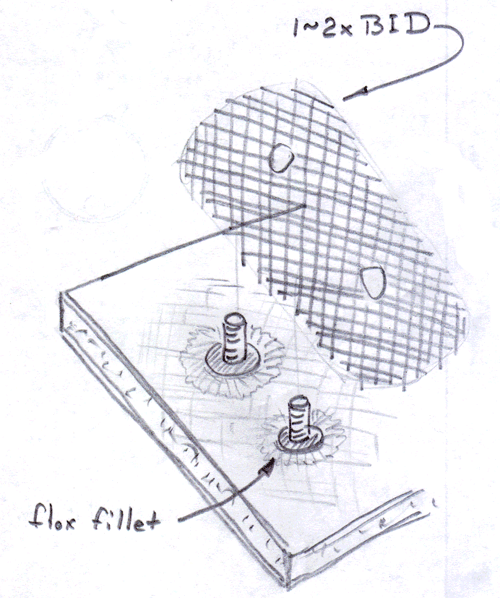
To ensure the bracket sits flush, remove the electrical tape from the threads
and reinstall the masked bracket on the studs with the stainless steel nuts.
Tighten only enough to set the bracket gently into the BID.
When the epoxy has set, remove the bracket, remove the peel ply and remove the
packing tape from the bracket.
You can make a handy tool for cleaning up the threads where the epoxy has wicked
up under the bracket and into the nut. We call this a "Cutter Nut" it is made by
holding a stainless steel nut in a vice and using a small dremel tool exploding
abrasive disk (wear goggles and body armor) you cut slots in the surface of the
nut at an appropriate angle to cut when tightening the nut.
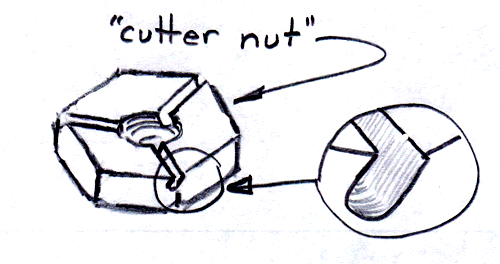
Its a simple matter to use a nut driver to run this nut down any epoxy grundged
threads and it cleans them right up. It also helps to flatten the cutting side
of the nut first against a sanding belt to remove any lead-in chamfer on the
nut's threads.
This whole technique works well because the studs will self align to the part you wish to mount and with more than one fastener they will naturally be perfectly oriented to the hole pattern.
We found this works well for us and of course your mileage may
vary.